User Guide
Table of Contents
- Introduction
- Getting Started
- Features
- FAQ
- Known issues
- Command summary
- Appendix A: Installing Java
Introduction
About TaskHub
Welcome to TaskHub, a powerful desktop application designed to make project management efficient and effortless.
With TaskHub, you will be able to:
- Store your employees’ contact information
- Create and manage projects for your employees to be delegated to
- Create customized tasks for each project and assign your employees to them
- View all of your employees, projects and tasks at a glance
and much more!
TaskHub uses a Command Line Interface (CLI) for you to type in your desired actions. If you are a fast typist, this is perfect for you as it allows you to execute commands without having to leave the keyboard and gets your project management tasks done faster than traditional GUI apps.
TaskHub also uses a Graphical User Interface (GUI) to display content and data. This allows for data to be presented to you in an elegant, fuss-free manner.
Start to streamline your project management workflow today with TaskHub!
About this User Guide
This user guide aims to provide you with all the information needed to get started with TaskHub.
If you are new to TaskHub, you may refer to the Navigating the User Guide section first, then to the Getting Started section to start installing and using TaskHub.
If you would like to find out more about its individual features, you may refer to the Features section.
If you are an experienced user and want to quickly refer to the various commands, you may refer to the Command Summary section.
If you would like to find out more about the technical aspects of TaskHub, you may refer to our Developer Guide.
Finally, if you would like an overview of this entire user guide, you may refer to our Table of Contents.
Navigating the User Guide
The following symbols will be used throughout this user guide to assist you.
Links:
- Words in blue are links that direct you to either a section of our user guide, or another website.
- At the bottom of every main section, there will be a Return to Table of Contents link directing you to the Table of Contents, allowing you to quickly switch between different sections.
Getting Started
Installing and Launching TaskHub
Step 1: Install Java
Ensure you have Java 11 or above installed on your computer. If you don’t have Java installed, follow the steps in Appendix A: Installing Java.
Step 2: Download TaskHub
Download the latest taskhub.jar from here.
Step 3: Set up TaskHub Home Folder
Copy or move the downloaded taskhub.jar file to the folder you want to use as the home folder for your TaskHub.
Step 4: Launch TaskHub
-
Open a terminal (MacOS) or command prompt (Windows).
-
Navigate to the folder where you placed the
taskhub.jarfile using thecdcommand. For example, our friendly TaskHubber has histaskhub.jarfile in/Users/timothyleow/Developer/TaskHub, so he’ll run:cd /Users/timothyleow/Developer/TaskHub -
Verify that your working directory contains
taskhub.jarby using thelscommand. You should seetaskhub.jarin the list of files printed. Here’s what our friendly TaskHubber got when running this command.timothyleow@timleows-MBP TaskHub % ls taskhub.jar -
Once your terminal’s working directory is the folder that contains
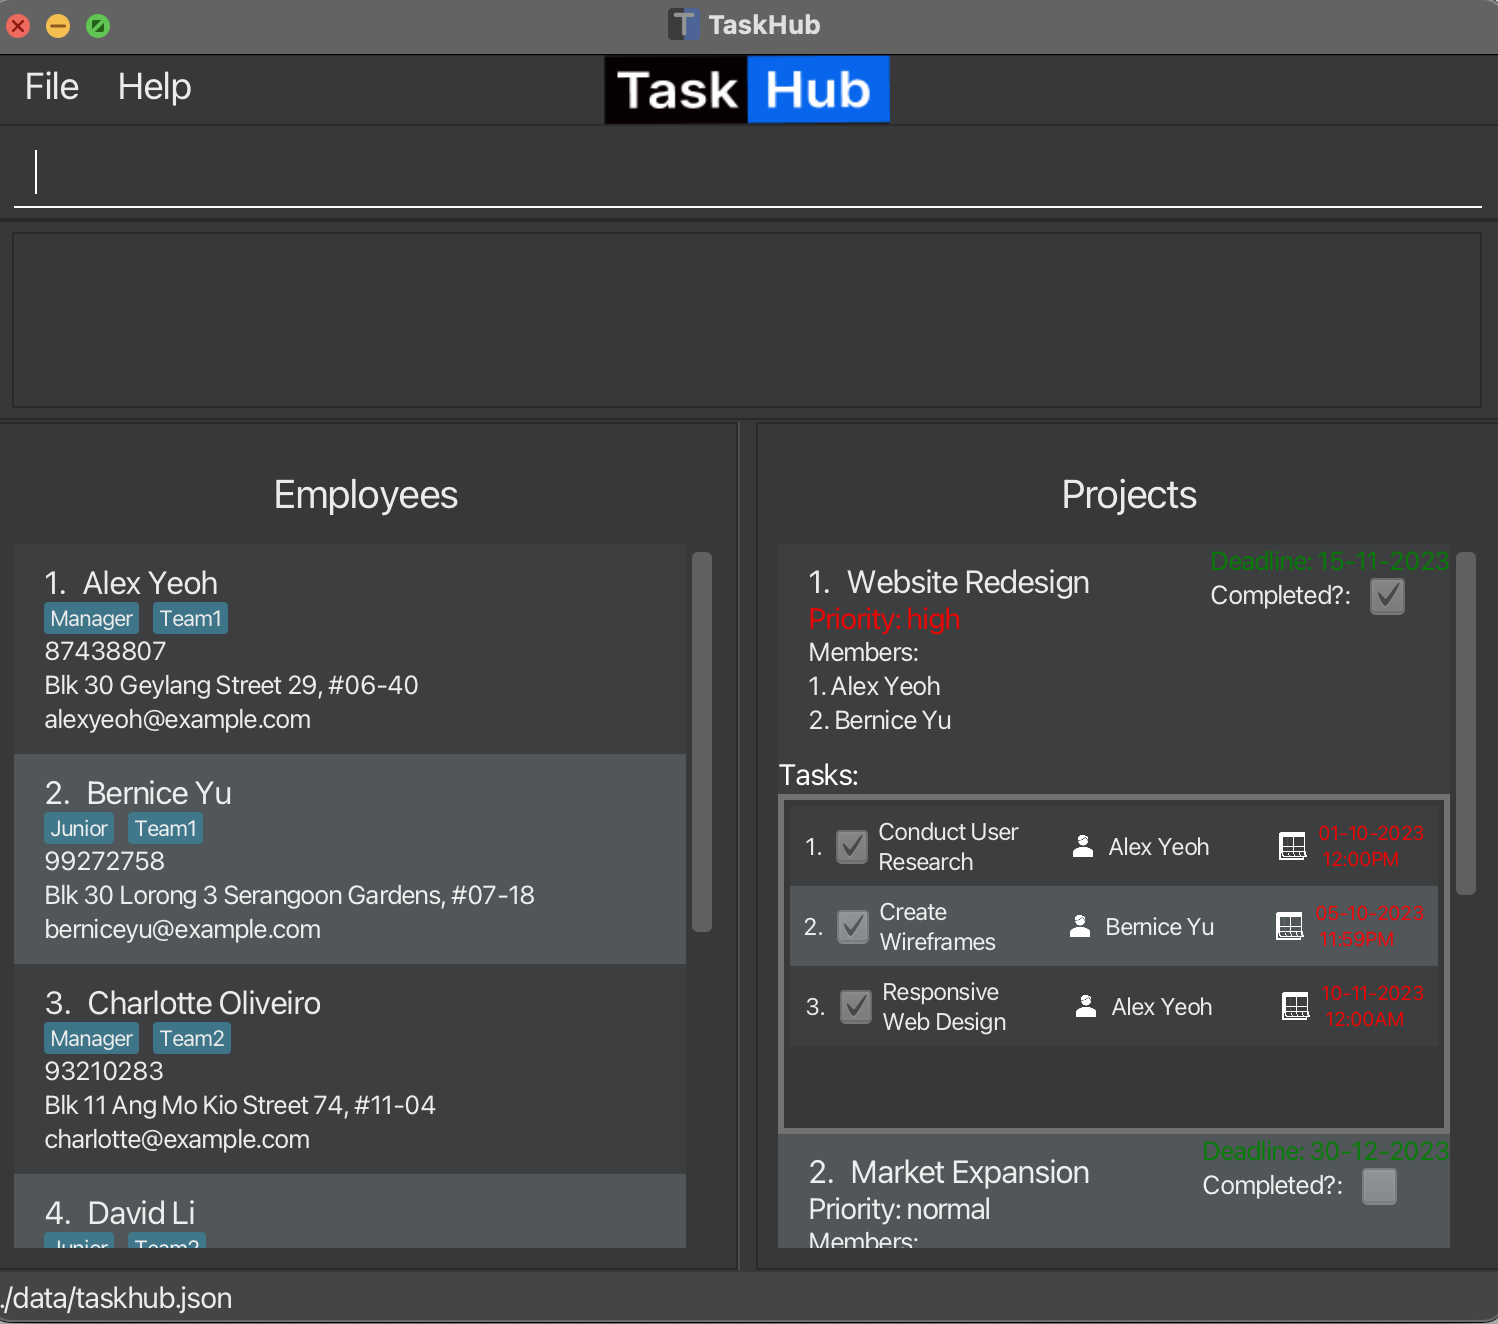
taskhub.jar, run the following command to launch TaskHub:java -jar taskhub.jarAfter executing this command, a graphical user interface (GUI) similar to the one below should appear shortly:
Note: The application comes with some sample data for your reference.
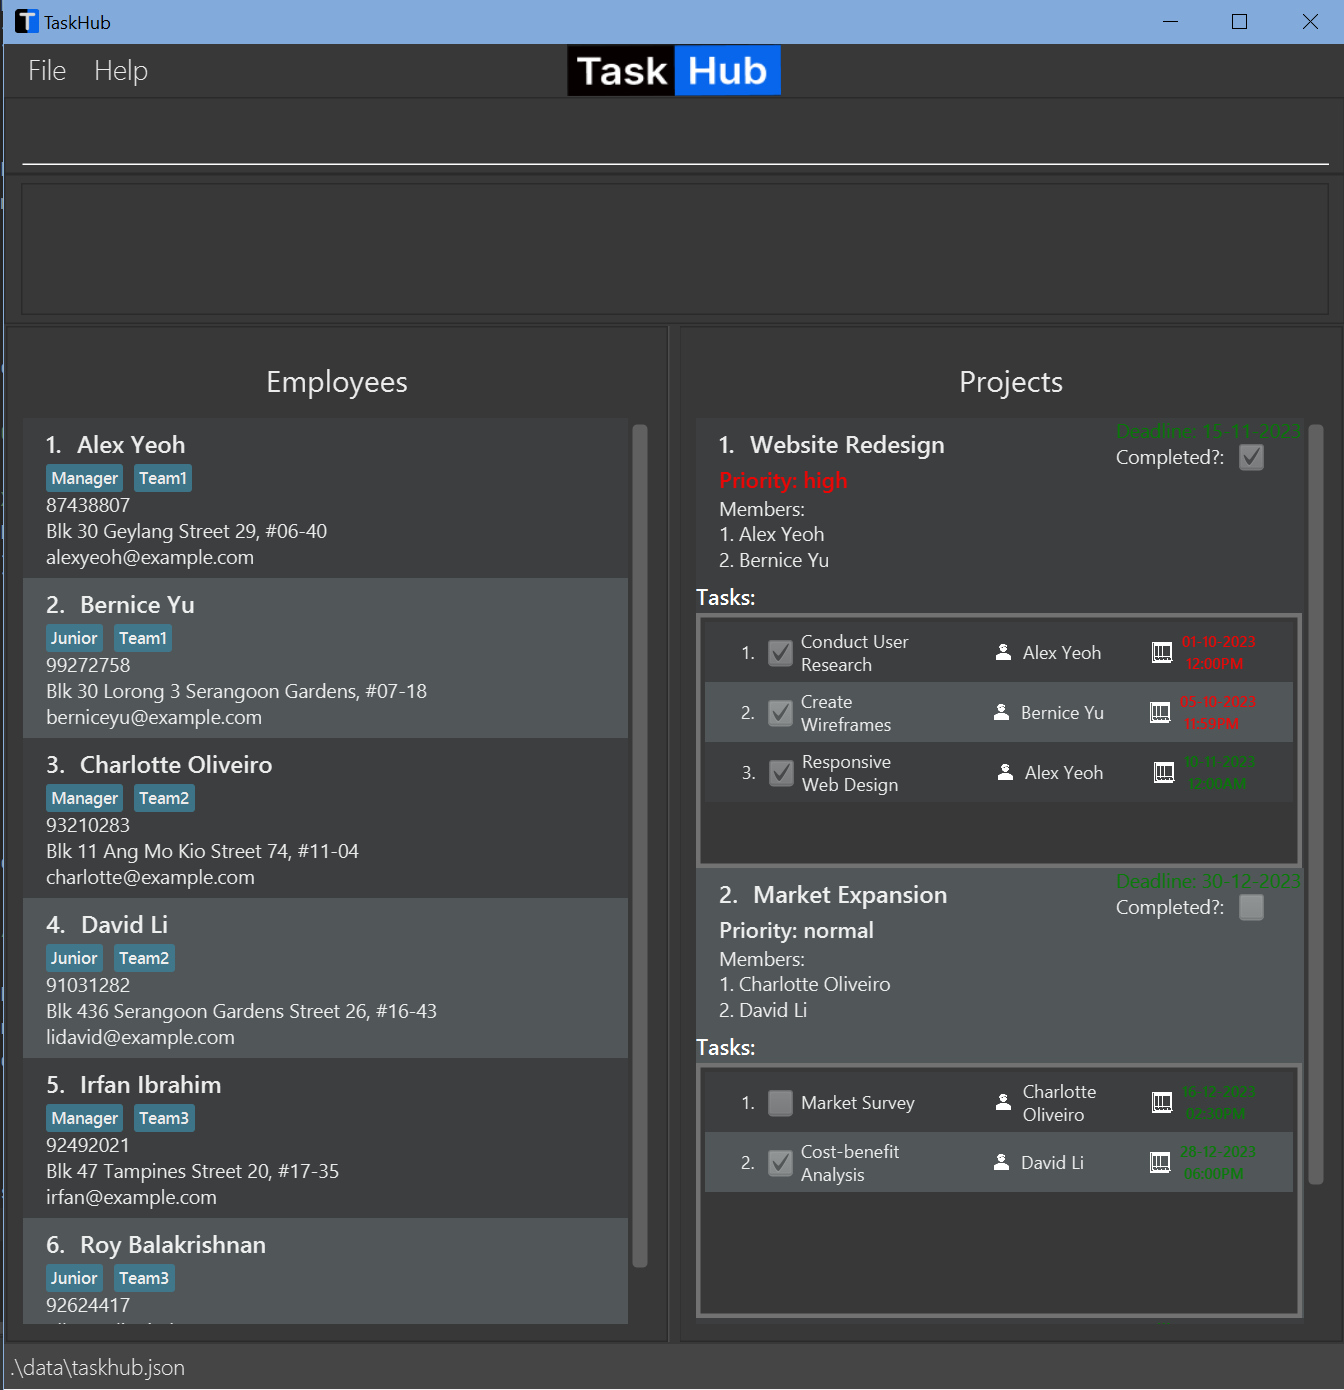
Understanding the components of TaskHub
Employees
An Employee is someone that you are managing. TaskHub allows you to store their essential details and tag them with their strengths and weaknesses so you can allocate them to suitable Projects or Tasks.
Attributes:
| Field | Description | Prefix for addE
|
|---|---|---|
| Name | Name of the employee. | n/ |
| Phone Number | Phone number of the employee. | p/ |
| Email address of the employee. | e/ |
|
| Address | Address of the employee. | a/ |
| Tags | Tags indicating strengths/weaknesses/position of the employee. | t/ |
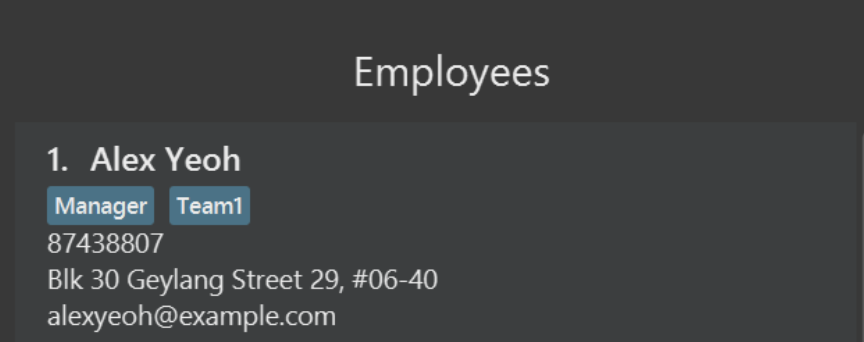
Projects
A Project in TaskHub is a managerial unit that includes information about Employees allocated to the project and an (optionally) set deadline. You can mark a Project as done when you deem fit. Additionally, you can add Tasks to a Project.
Attributes:
| Field | Description | Prefix for addP
|
Relevant Command(s) |
|---|---|---|---|
| Name | Name of the project. | n/ |
- |
| Employees | Employees assigned to the project. | em/ |
assignP |
| Deadline | Deadline for the project. | - | dlP |
| Priority | Priority level of the project. | - | priorityP |
| CompletionStatus | Indicates whether the project is completed or in progress. | - |
markP, unmarkP
|
| Tasks | Tasks associated with the project. | - | addT |
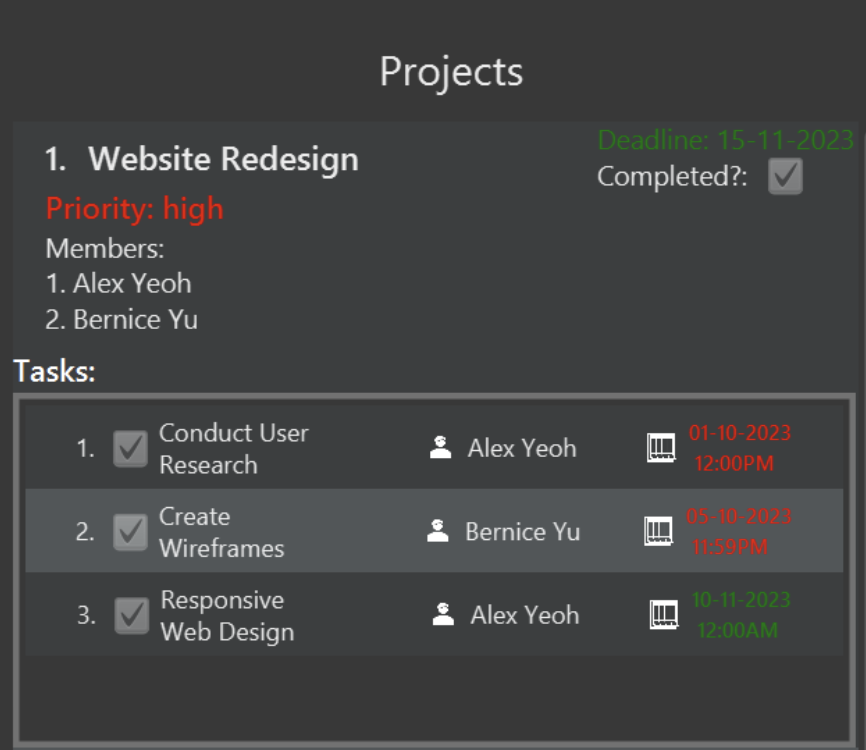
Tasks
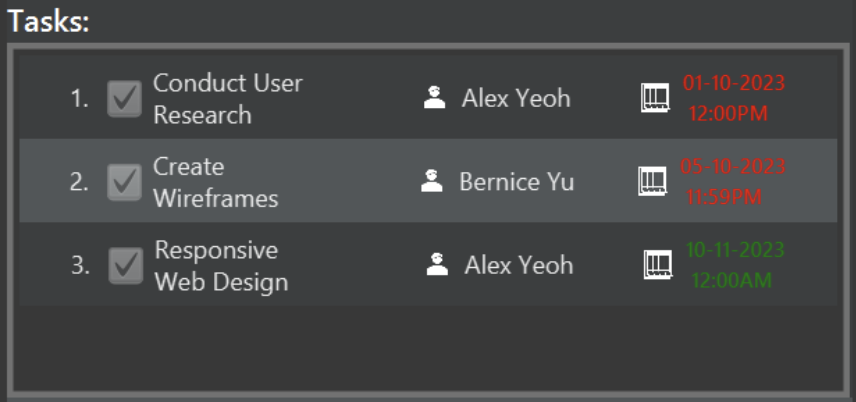
A Task in TaskHub represents a specific job within a Project that can be assigned to an Employee under that Project. Tasks are required to have a deadline. Managing Tasks will be the main way of monitoring the work done within your TaskHub!
Attributes:
| Field | Description | Prefix for addT
|
Relevant Command |
|---|---|---|---|
| Name | Name of the task. | n/ |
- |
| Employee | Employee assigned to the task. | em/ |
assignT |
| Deadline | Deadline for completing the task. | d/ |
- |
| isDone | Indicates whether the task is complete. | N.A. |
markT, unmarkT
|
Understanding the User Interface (UI)
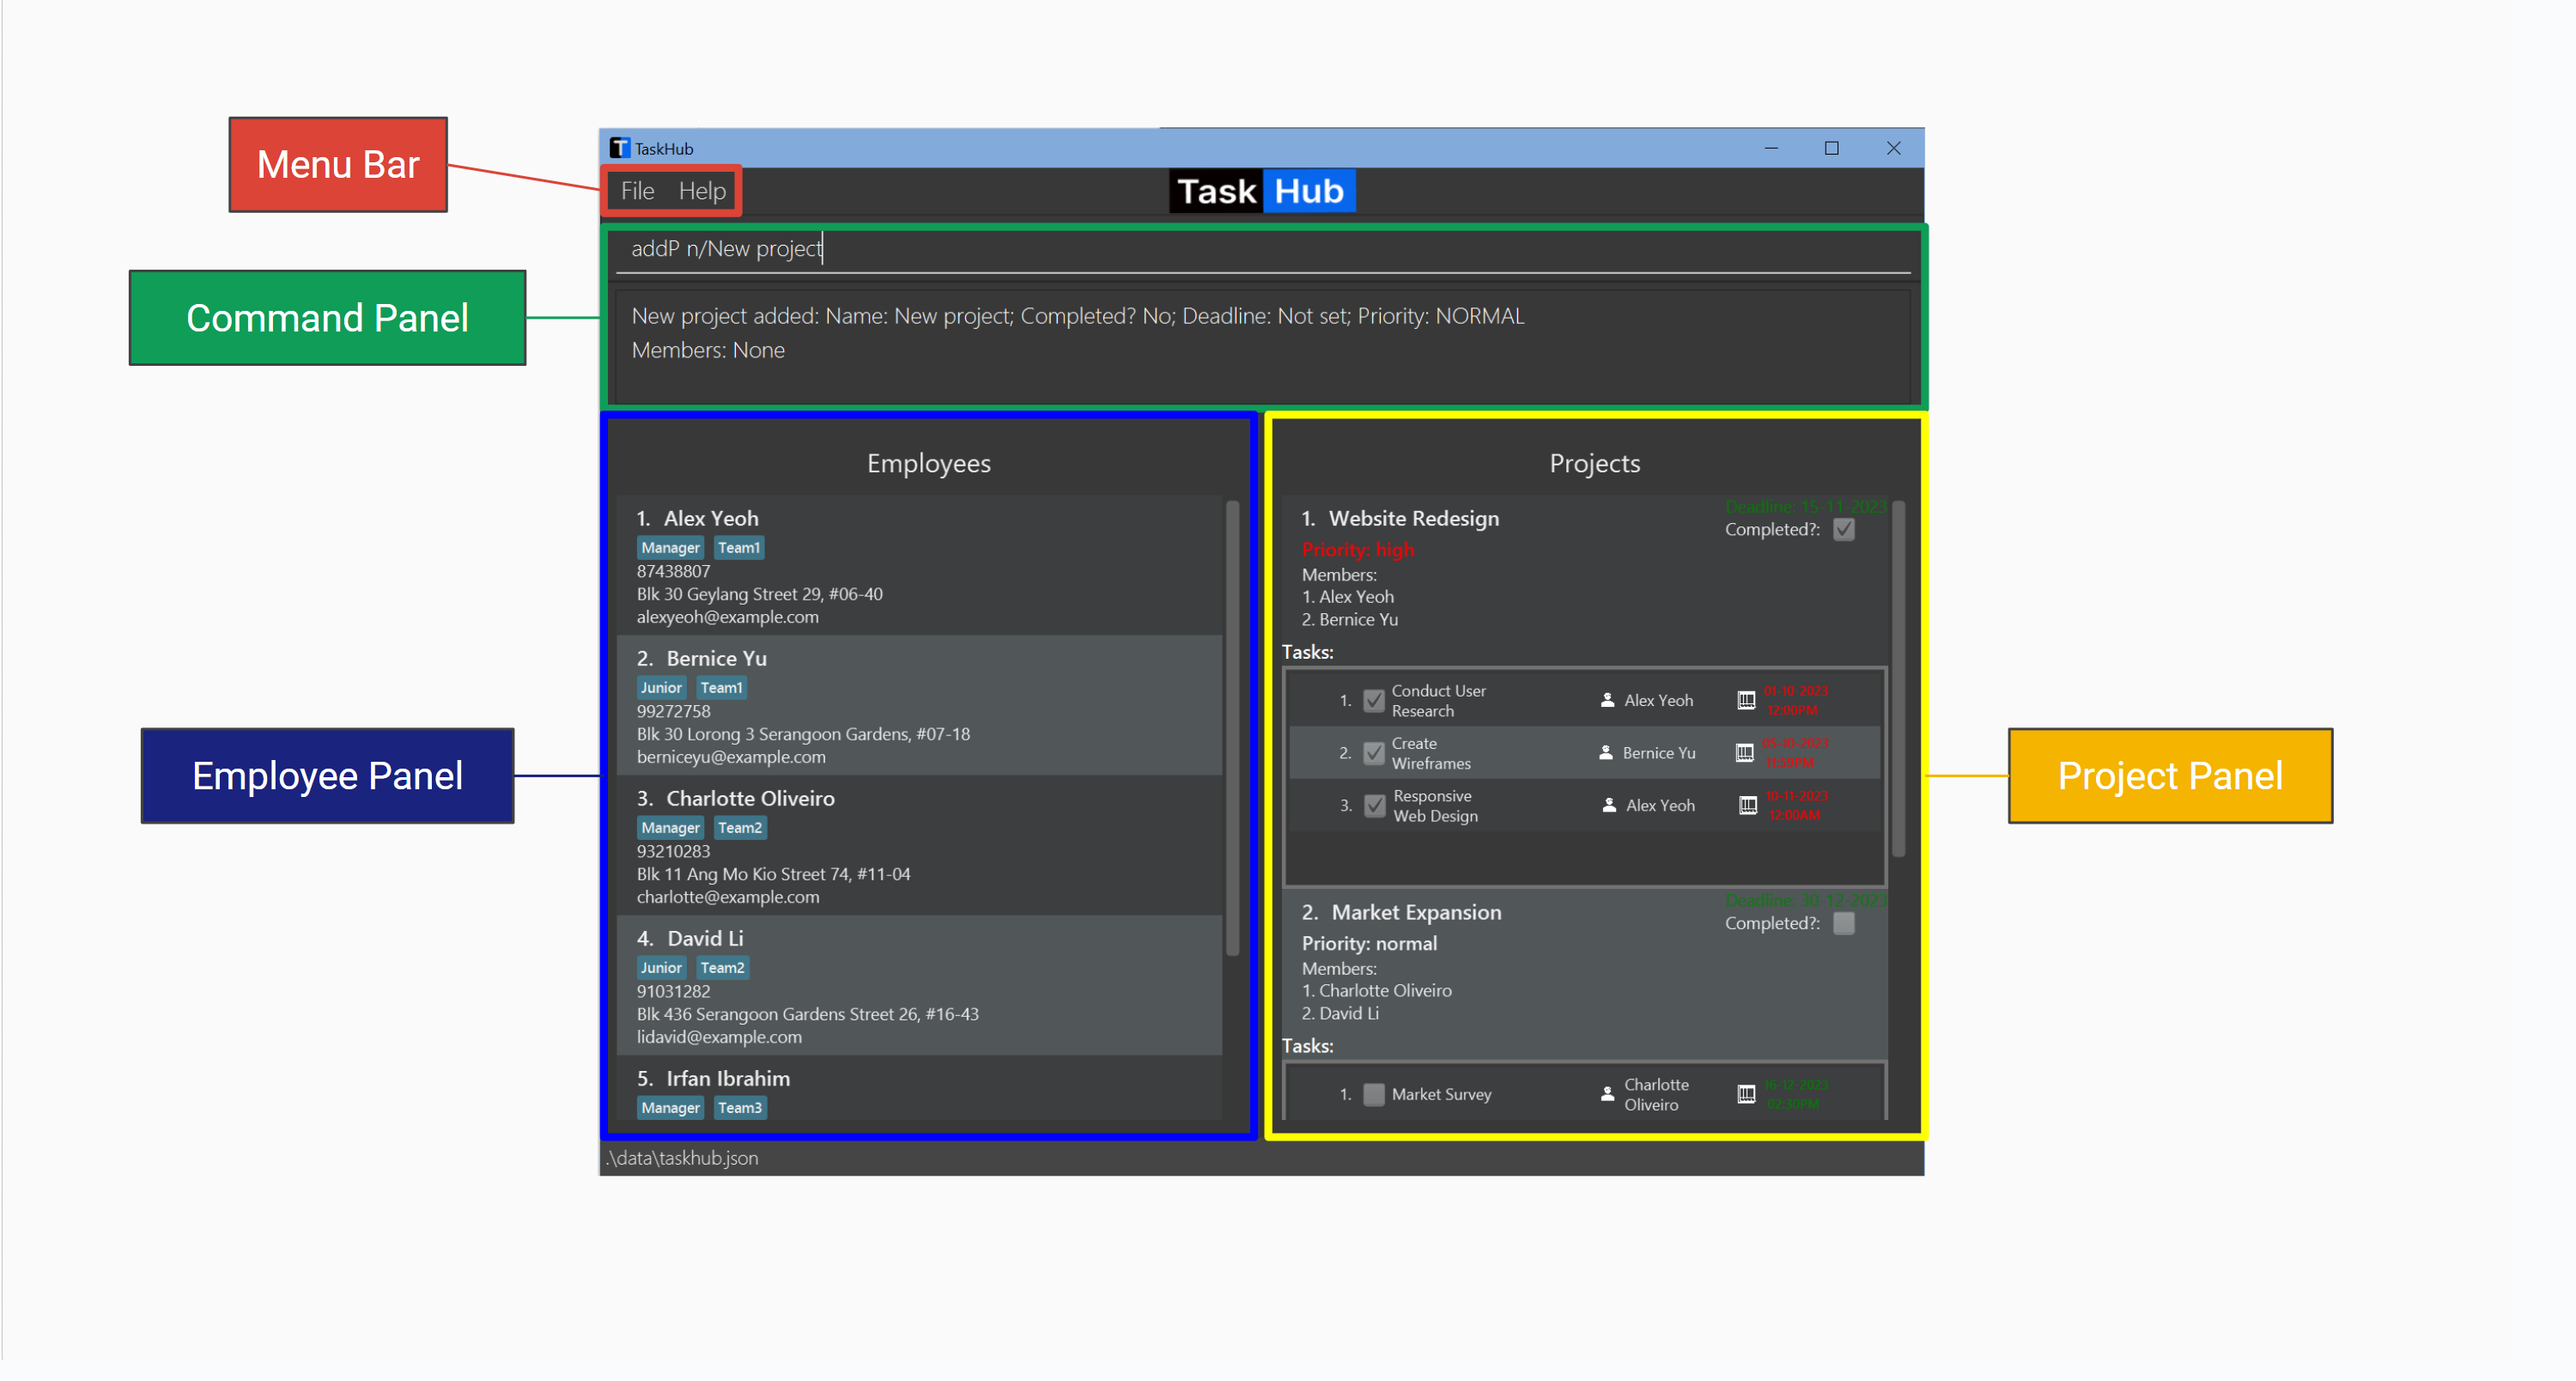
TaskHub’s UI consists of 4 main parts that you will be using for your project management:
Menu Bar
- The menu bar is where you can exit TaskHub or even open the help window with a simple click of your mouse!
- While commands to exit TaskHub or open the help window can be entered as a command, this is a beginner-friendly alternative for newer users who might not be so familiar with the commands.
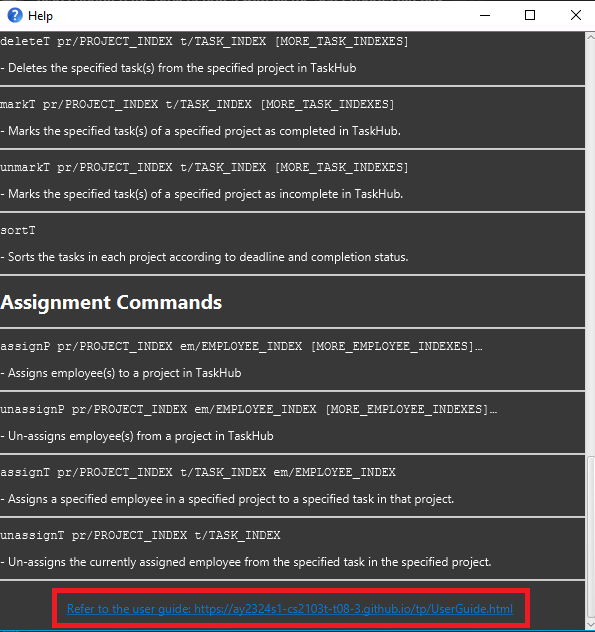
Help:
Upon clicking help on the menu bar as shown below or by using the shortcut F1,
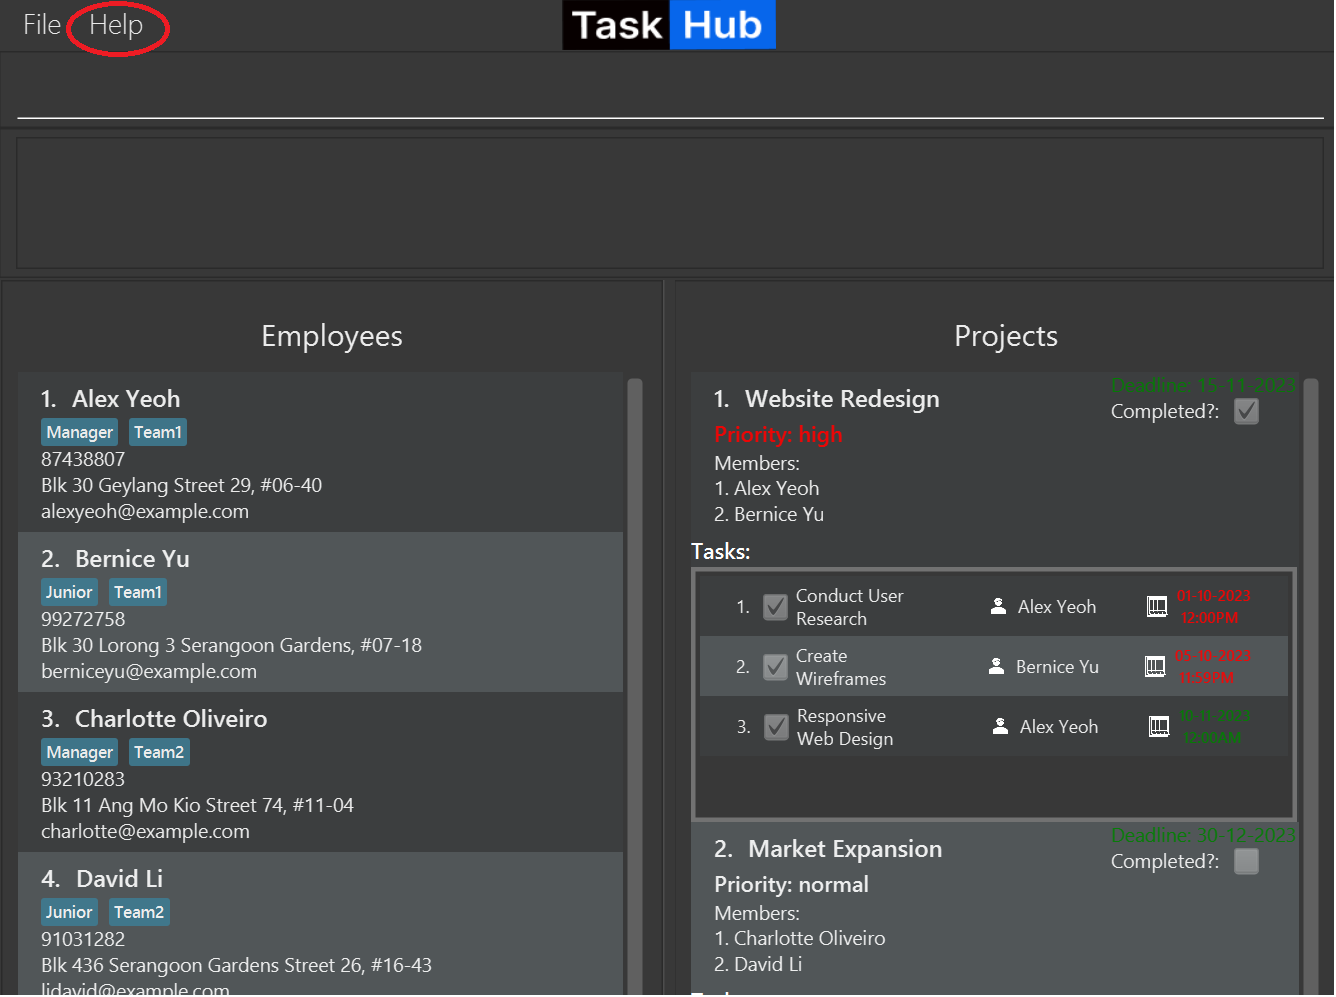
a help window pops up with a list of all the possible commands:
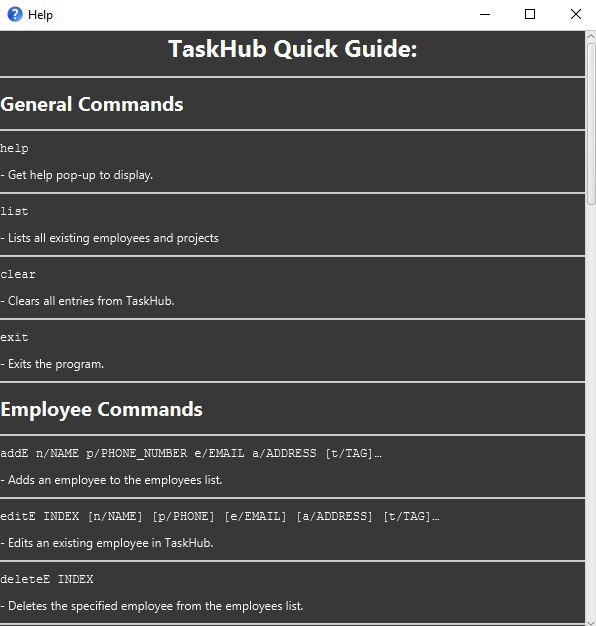
and at the bottom of the window, is a link to our user guide.
Command Panel
- The command panel is the main panel that you will be interacting with to key in commands and also get back the results of those commands.
- The upper box is where you can type in your command.
- And the lower box is where you will see the results of those commands.
Employee Panel
- The employee panel is one of two panels that you can use to see what is stored in TaskHub.
- The employee panel, as the name suggests, is where all the information about each employee is stored.
- You can see their name, phone number, address, email address, and even whatever tags that you have for each of them as needed!
Project Panel
- The project panel is the other panel that you will be using to see the data stored in TaskHub.
- Projects, as well as their members, tasks to complete in the project, and other important details for managing your project are stored here!
Quick start
deleteP, which is irreversible. If you wish to keep the sample data, then you can head straight to the Features section below to figure out TaskHub on your own.
If you’re okay with modifying the sample data, then we’ll proceed with our first gist of project management with TaskHub. Time is ticking!
At this point, you should have installed Java 11 and be able to to run TaskHub without issues. If you haven’t done so, you may return to the Installation Guide.
If all is well, TaskHub should look something like this when you first run it:
Step 1: Deleting a finished project
Hmmm, it seems like you’re done with the ‘Website Redesign Project’. Let’s get rid of this data by running the below command.
deleteP 1
You should get the following response:
Deleted Project:
Name: Website Redesign;
Completed? Yes;
Deadline: 15-11-2023;
Priority: HIGH
Members: Alex Yeoh, Bernice Yu
Now, you’re looking at the ‘Market Expansion’ project, which we’ll be focusing on.
Step 2: Adding a new employee to TaskHub:
You’ve just got an email from your boss, saying that the fresh graduate that you recently interviewed is joining your team!
Here are his details:
| Name | Anton Tan |
|---|---|
| Phone Number | 98765432 |
| anton@mail.com | |
| Address | Anton Street, block 123, #01-01 |
| Strengths | TeamPlayer, Hardworking |
Let’s run the following command to add him to your team of Employees.
addE n/Anton Tan p/98765432 e/anton@mail.com
 a/Anton Street, block 123, #01-01 t/TeamPlayer t/Hardworking
You should get the following response:
New employee added: Anton Tan;
Phone: 98765432;
Email: anton@mail.com;
Address: Anton Street, block 123, #01-01;
Tags: [TeamPlayer][Hardworking]
Step 3: Assigning an Employee to a Project in TaskHub:
You’ve decided that you need more help with the ‘Market Expansion Project’. Let’s run the following command to enlist Anton’s help:
assignP pr/1 em/7
You should get the following response:
Member(s) have been assigned!
Name: Market Expansion; Completed? No; Deadline: 30-12-2023; Priority: NORMAL
Members: Charlotte Oliveiro, David Li, Anton Tan
Step 4: Adding a Task to a Project:
Anton is eager to contribute to his newly assigned project. Since you’ve found that he is particularly skilled at Market Segmentation, let’s run the following command to give him a task that he will excel at. To measure his capabilities, you’ll only give him until the end of November to complete this.
addT n/Market Segmentation pr/1 em/3 d/30-11-2023 2359
You should get the following response:
New task added to project 1,
Description: Market Segmentation;
Deadline: 30 Nov 2023, 11:59PM;
Assignee: Anton Tan
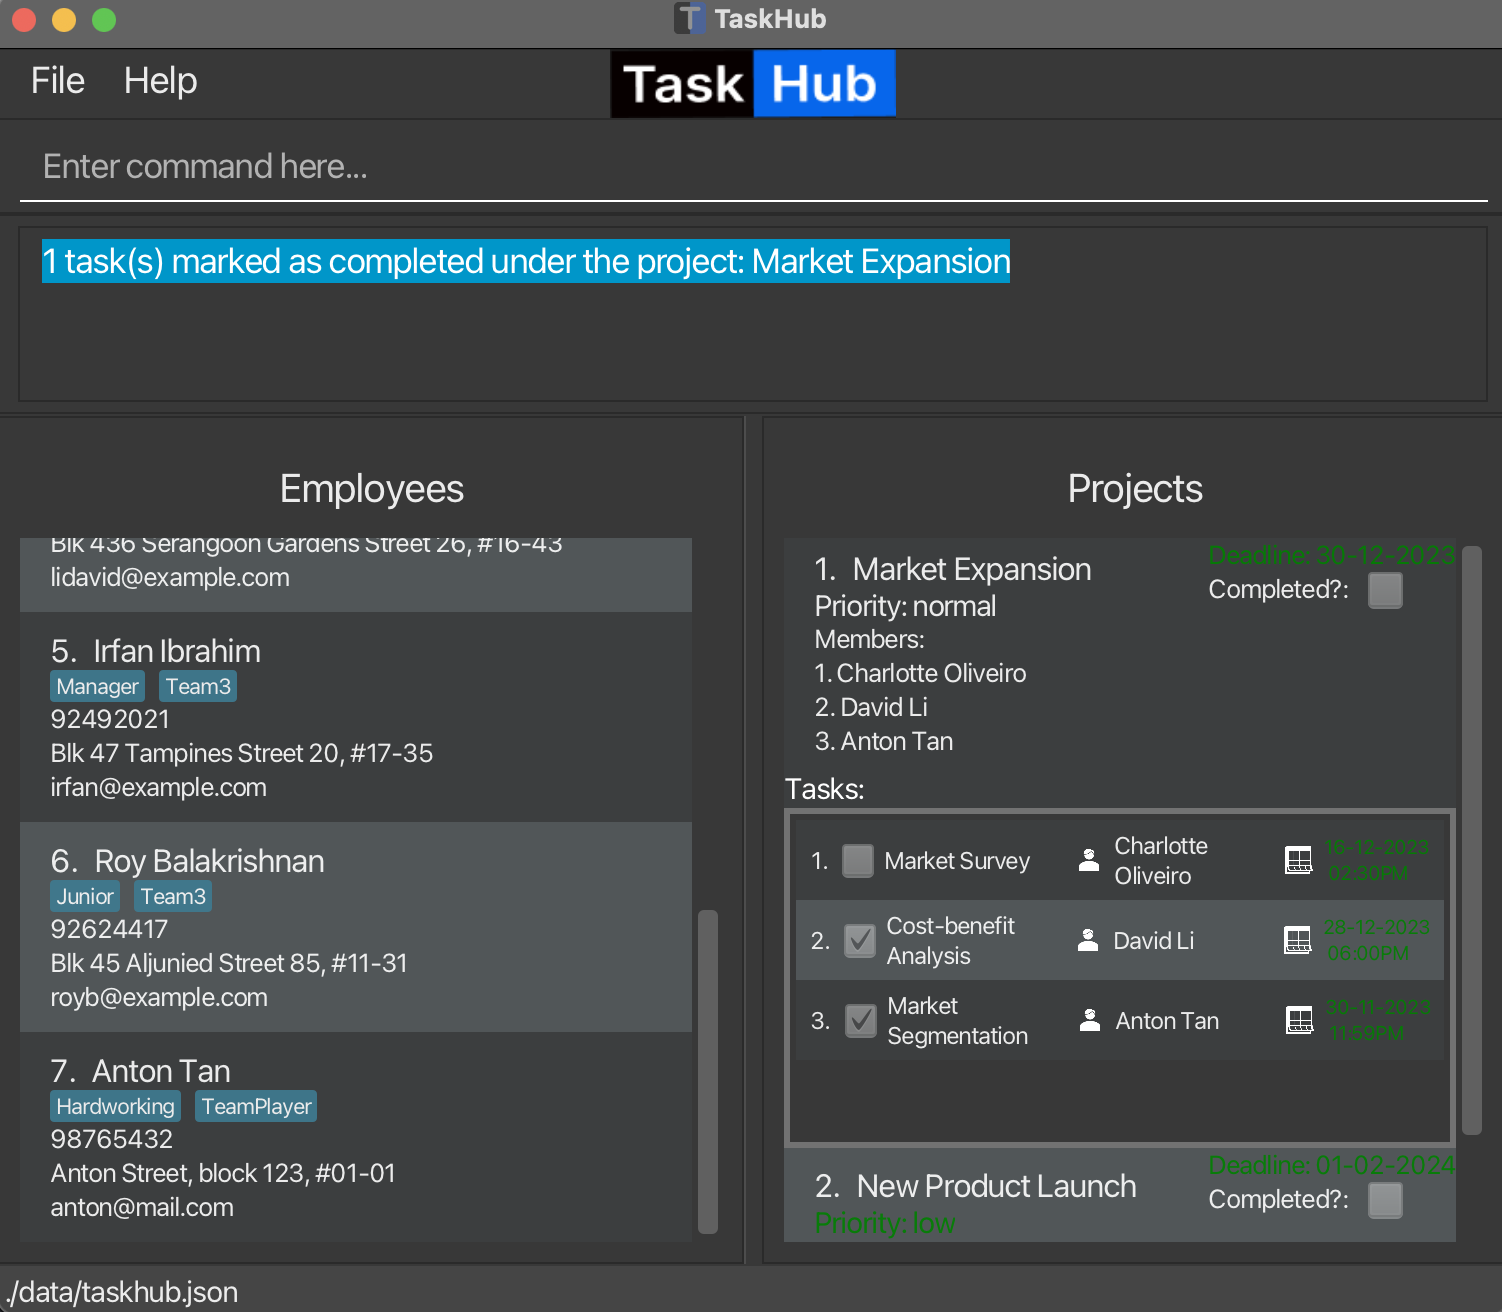
Step 5: Marking a Task as Complete:
It’s the next morning. You receive an eager email from Anton reporting that he’s already completed the Market Segmentation Task. After reviewing his report, you are thoroughly impressed and wish to mark his work as done in TaskHub. Let’s run this command:
markT pr/1 t/3
You should get the following response:
1 task(s) marked as completed under the project: Market Expansion
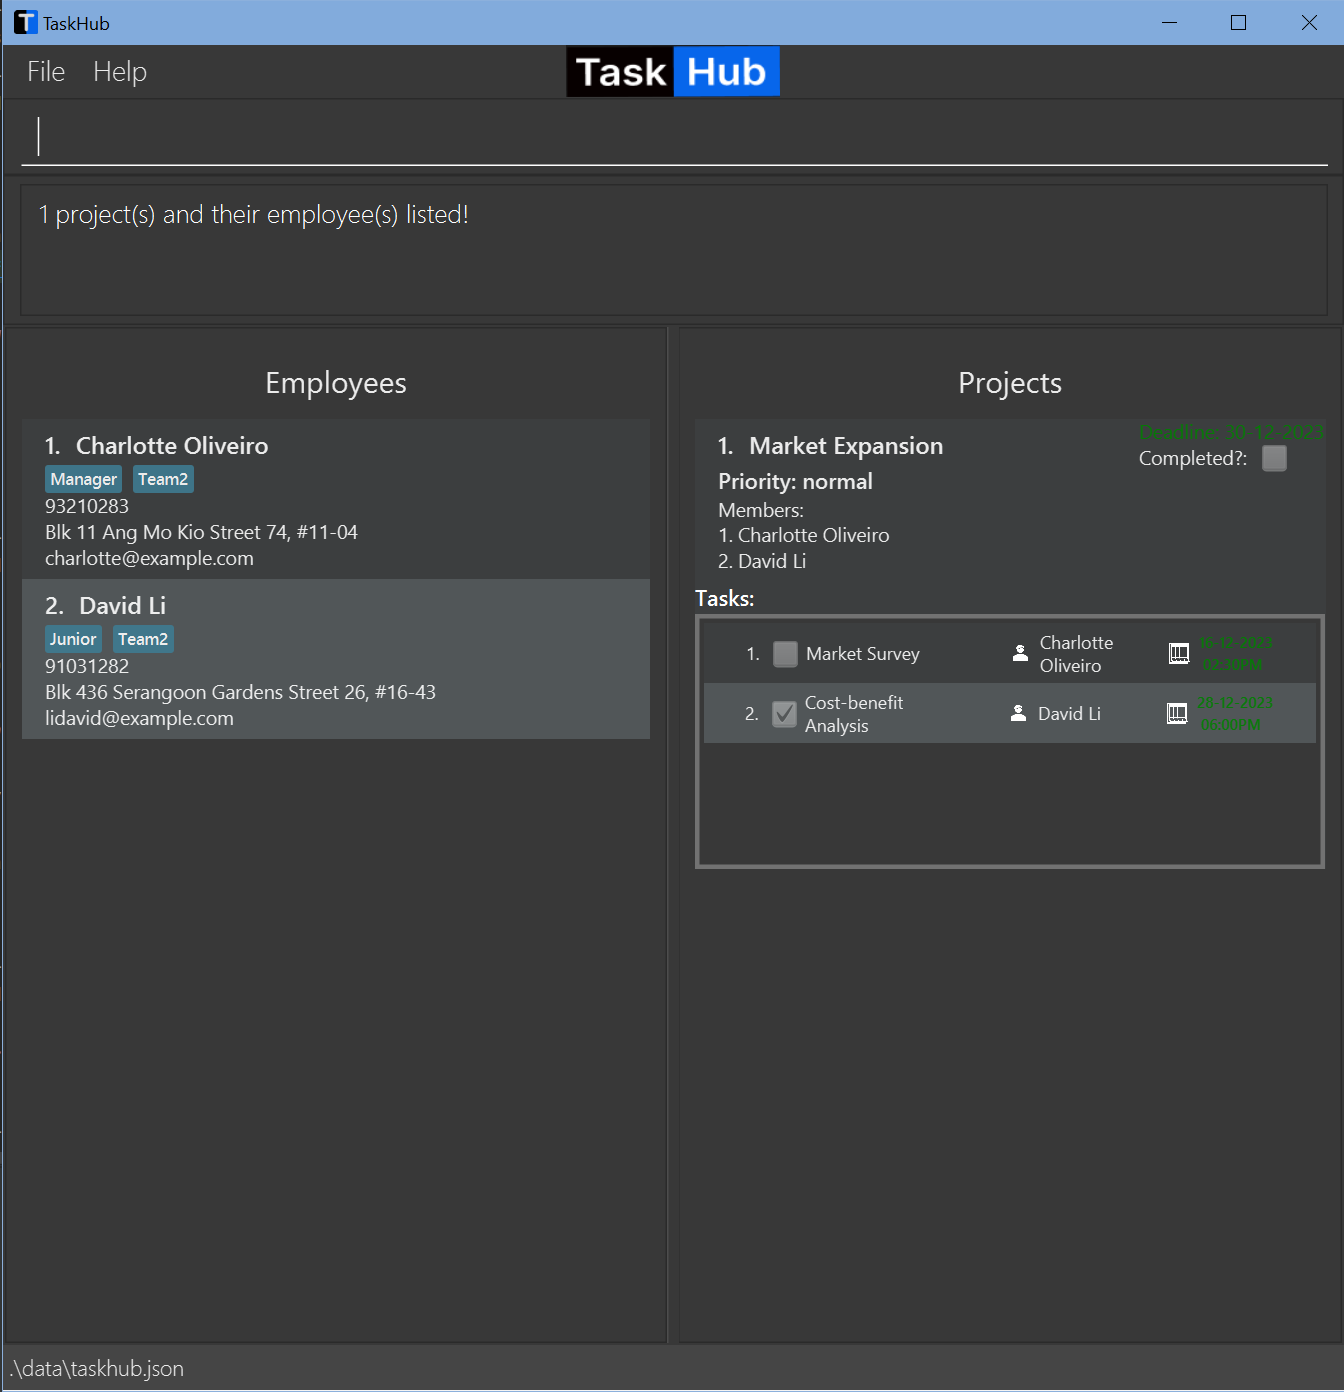
If you’ve followed the steps correctly, TaskHub should look something like this now:
Scroll down in the Employees pane to notice Anton, the newest addition to your team.
For a more comprehensive overview of what you can achieve with TaskHub, you may proceed to the Features section below.
Features
![]() Notes about the command format:
Notes about the command format:
-
Words in
UPPER_CASEare the parameters to be supplied by the user.
e.g. inaddE n/NAME,NAMEis a parameter which can be used asaddE n/John Doe. -
Items in square brackets are optional.
e.g.n/NAME [t/TAG]can be used asn/John Doe t/friendor asn/John Doe. -
Items with
… after them can be used multiple times including zero times.
e.g.[t/TAG]…can be used ast/friend,t/friend t/familyetc. -
Parameters can be in any order.
e.g. if the command specifiesn/NAME p/PHONE_NUMBER,p/PHONE_NUMBER n/NAMEis also acceptable. -
All commands that can take in multiple indexes should have its indexes separated by single spaces.
e.g. if the command specifiesINDEX [MORE_INDEXES], it should be entered as1 2 3instead of1 2 3. -
Extraneous parameters for commands that do not take in parameters (such as
help,list,listE,listP,exitandclear) will be ignored.
e.g. if the command specifieshelp 123, it will be interpreted ashelp. -
Commands that contain
[MORE INDEXES]are able to take in more than one index for the relevant parameter, separated by spaces.
e.g.1,2 5 4,3 7 -
If you are using a PDF version of this document, be careful when copying and pasting commands that span multiple lines as space characters surrounding line-breaks may be omitted when copied over to the application.
General Commands
View help: help
Enter a help command into TaskHub to quickly display the same help window without having to click on help.
Format: help
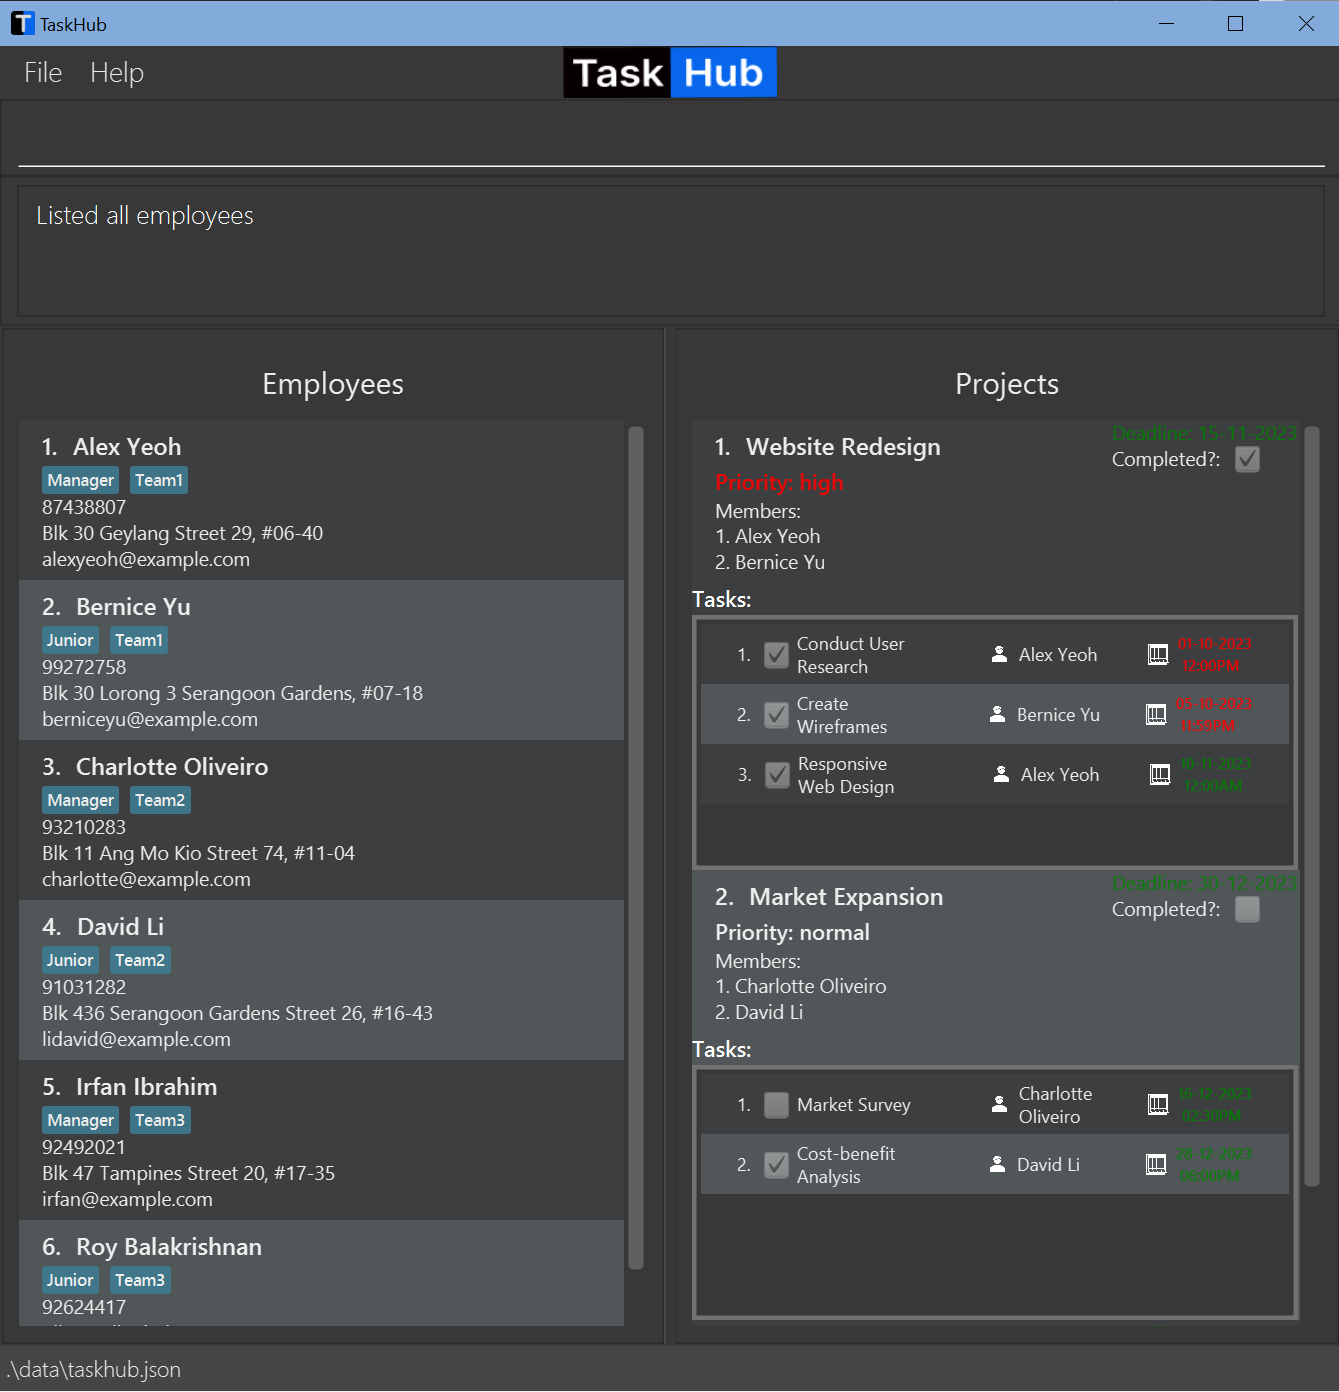
List all employees and projects: list
Shows a list of all employees and projects in TaskHub.
Format: list
Clear all entries: clear
Clears all entries from TaskHub.
Format: clear
![]() Danger
Danger
- This action is irreversible.
- Please ensure that you are certain that you want to delete all existing employees, projects and tasks before proceeding.
Exit the program: exit
Exits the program.
Format: exit
Employee Commands
Command Parameters
| Parameter | Description | Examples |
|---|---|---|
NAME |
The employee’s name. It should only contain alphanumeric characters and spaces. It should not be blank and should not exceed 80 characters. |
- John Doe- Vishnu
|
PHONE |
The employee’s phone number. It should only contain numbers. It should be at least 3 digits long and should not exceed 20 digits. |
- 91822213- 9313491028503
|
EMAIL |
The employee’s email. It should be of the format local-part@domain. The local-part should only contain alphanumeric characters and these special characters, excluding the parentheses, (+_.-) This is followed by a ’@’ and then a domain name. The domain name is made up of domain labels separated by periods. The domain name must end with a domain label at least 2 characters long, have each domain label start and end with alphanumeric characters, and have each domain label consist of alphanumeric characters, separated only by hyphens, if any. The total length of the email should not exceed 100 characters. |
-john.doe@gmail.com- bernice@hotmail.com
|
ADDRESS |
The employee’s address. It can take any values, and it should not be blank. It should not exceed more than 100 characters. |
- Ang Mo Kio Industrial Park 2 #01-1427
|
TAG |
The employee’s tag(s). It should only contain alphanumeric characters. It should not exceed more than 40 characters. |
- Manager- Team1
|
INDEX |
The index number of the employee as shown in the employee panel. It should be a positive integer, and should not be more than the number of employees currently shown in the displayed employee panel. It should be less than 1000. |
- 1
|
KEYWORD |
The keyword to find an employee by name. It should only contain alphanumeric characters and spaces. It is case-insensitive. |
- Alex- alex yeoh
|
Note that some of the limits for the parameters stated above are not enforced by the application. You are recommended to follow these limits for the best user experience. We may enforce them in a future iteration.
Add an employee: addE
Adds an employee to the employees list.
Format: addE n/NAME p/PHONE e/EMAIL a/ADDRESS [t/TAG]…
Examples:
addE n/John Doe p/98765432 e/johnd@example.com a/John street, block 123, #01-01addE n/Betsy Crowe t/Junior e/betsycrowe@example.com a/Brick street p/91234567 t/Employee
Edit an employee: editE
Edits an existing employee in the TaskHub.
Format: editE INDEX [n/NAME] [p/PHONE] [e/EMAIL] [a/ADDRESS] [t/TAG]…
- Edits the employee at the specified
INDEX. - The index refers to the index number shown in the displayed employee panel.
- The index must be a positive integer 1, 2, 3, …
- At least one of the optional fields must be provided.
- Existing values will be updated to the input values.
- When editing tags, the existing tags of the employee will be removed i.e. adding of tags is not cumulative.
- You can remove all the employee’s tags by typing
t/without specifying any tags after it.
Examples:
-
editE 1 p/91234567 e/johndoe@example.comEdits the phone number and email address of the 1st employee to be91234567andjohndoe@example.comrespectively. -
editE 2 n/Betsy Crower t/Edits the name of the 2nd employee to beBetsy Crowerand clears all existing tags.
Delete an employee: deleteE
Deletes the specified employee from the employees list.
Format: deleteE INDEX
- Deletes the employee at the specified
INDEX. - The index refers to the index number shown in the displayed employee panel.
- The index must be a positive integer 1, 2, 3, …
![]() Danger
Danger
- This action is irreversible.
- Please ensure that you are certain that you want to delete the employee before proceeding.
Examples:
-
listEfollowed bydeleteE 2deletes the 2nd employee in the employees list. -
findE Betsyfollowed bydeleteE 1deletes the 1st employee in the results of thefindEcommand.
List all employees: listE
Shows a list of all employees in TaskHub.
Format: listE
Locate employees by name: findE
Finds employees whose names contain any of the given keywords. Additionally, it shows only the projects that these employees are under.
Format: findE KEYWORD [MORE_KEYWORDS]…
- The search is case-insensitive. e.g.
hanswill matchHans - The order of the keywords does not matter. e.g.
Hans Bowill matchBo Hans - Only the name is searched.
- Only full words will be matched e.g.
Hanwill not matchHans - Employees matching at least one keyword will be returned (i.e.
ORsearch). e.g.Hans Bowill returnHans Gruber,Bo Yang
Examples:
-
findE JohnreturnsjohnandJohn Doe -
findE alex davidreturnsAlex Yeoh,David Li -
findE davidreturnsDavid Li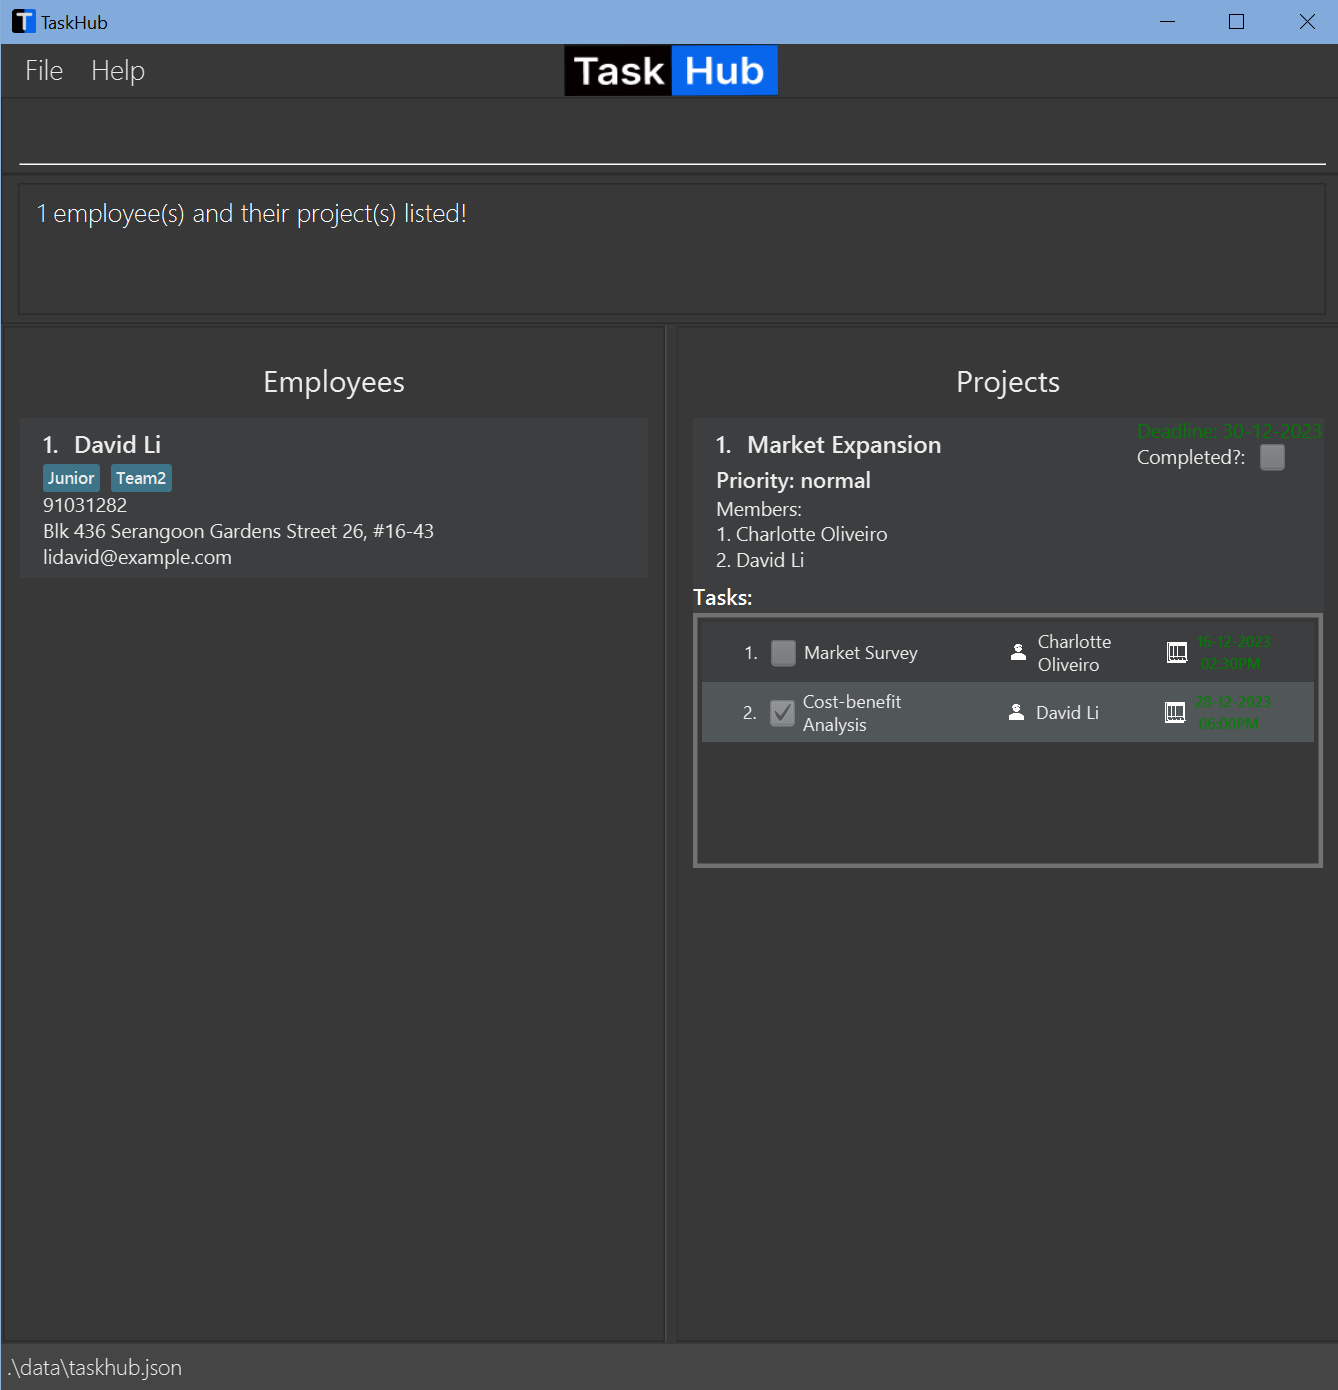
Project Commands
Command Parameters
| Parameter | Description | Examples |
|---|---|---|
NAME/ PROJECT_NAME
|
The project’s name. It should only contain alphanumeric characters and spaces. It should not be blank and should not exceed 80 characters. |
- Website Redesign- Market Sentiment Analysis
|
EMPLOYEE_INDEX |
The index number of the employee as shown in the employee panel. It should be a positive integer, and should not be more than the number of employees currently shown in the displayed employee panel. It should be less than 1000. |
- 1
|
INDEX |
The index number of the project as shown in the project panel. It should be a positive integer, and should not be more than the number of projects currently shown in the displayed project panel. It should be less than 1000. |
- 2
|
PRIORITY |
The project’s priority level. It should only take one of these 3 values: low, normal, high. |
- low- high
|
DEADLINE |
The project’s deadline date. It can either be empty (to indicate that there is no deadline set), or it must be a valid date in the dd-MM-yyyy format. |
- 28-02-2024- 08-11-2022
|
KEYWORD |
The keyword to find a project by name. It should only contain alphanumeric characters and spaces. It is case-insensitive. |
- Website- create website
|
Note that some of the limits for the parameters stated above are not enforced by the application. You are recommended to follow these limits for the best user experience. We may enforce them in a future iteration.
Add a new project: addP
Adds a new project in TaskHub.
Format: addP n/PROJECT_NAME [em/EMPLOYEE_INDEX(ES)]
- Adds a new project with the given name, and assigns employee(s) to this project if
EMPLOYEE_INDEX(ES)are provided. - The index(es) refers to the index number(s) shown in the displayed employee panel.
- If multiple indexes are provided, each employee index must be separated by a singular space.
- The index(es) must be a positive integers 1, 2, 3,…
- There is no deadline set by default.
- The priority is
normalby default. - The status is
not completedby default.
list or listP.Examples:
-
addP n/Project1 em/1will addProject1to the projects list, and assigns the employee at index 1 currently displayed in the employee panel to this project. -
addP n/Project2will add an emptyProject2to the projects list.
Edit a project: editP
Edits an existing project in TaskHub.
Format: editP INDEX [n/NAME] [p/PRIORITY] [d/DEADLINE]
- Edits the project at the specified
INDEX. - The index refers to the index number shown in the displayed project panel.
- The index must be a positive integer 1, 2, 3, …
- At least one of the optional fields must be provided.
- Existing values will be updated to the input values.
- If a
DEADLINEdate is provided, it must be in thedd-MM-yyyyformat. - You can remove the
DEADLINEof the project by typingd/without specifying any deadline after it. - You can also provide a
DEADLINEdate e.g.d/01-01-2024, in which case the provided deadline will overwrite the current deadline (if any).
Examples:
-
editP 1 n/Market Analysis p/lowEdits the name and priority of the 1st project toMarket Analysisandlowrespectively. -
editP 2 p/high d/Edits 2nd project’s priority tohighand removes the deadline.
Delete a project: deleteP
Deletes the specified project from TaskHub.
Format: deleteP INDEX
- Deletes the project at the specified
INDEX. - The index refers to the index number shown in the displayed project panel.
- The index must be a positive integer 1, 2, 3,…
![]() Danger
Danger
- This action is irreversible.
- Please ensure that you are certain that you want to delete the project before proceeding.
Examples:
-
listPfollowed bydeleteP 2deletes the 2nd project in TaskHub.
Mark project(s) as completed: markP
Marks the specified project(s) as completed in TaskHub.
Format: markP INDEX [MORE_INDEXES]
- Marks the project(s) at the specified
INDEX(ES)as completed. - The index(es) refers to the index number(s) shown in the displayed project panel.
- If multiple indexes are provided, each index must be separated by a singular space.
- The index(es) must be a positive integer 1, 2, 3,…
Examples:
-
listPfollowed bymarkP 1 3marks the 1st and 3rd projects as completed in TaskHub. -
findP Capstonefollowed bymarkP 1marks the 1st project in the results of thefindPcommand as completed.
Mark project(s) as incomplete: unmarkP
Marks the specified project(s) as incomplete in TaskHub.
Format: unmarkP INDEX [MORE_INDEXES]
- Marks the project(s) at the specified
INDEX(ES)as incomplete. - The index(es) refers to the index number(s) shown in the displayed projects panel.
- If multiple indexes are provided, each index must be separated by a singular space.
- The index(es) must be a positive integer 1, 2, 3,…
Examples:
-
listPfollowed byunmarkP 1 3marks the 1st and 3rd projects as incomplete in TaskHub. -
findP Capstonefollowed byunmarkP 1marks the 1st project in the results of thefindPcommand as incomplete.
Edit deadline of (a) project(s): dlP
Edits the deadline of the specified project(s) in Taskhub.
Format: dlP INDEX [MORE_INDEXES] d/[DEADLINE]
- Edits the deadline of the project(s) at the specified
INDEX(ES). - The index(es) refers to the index number(s) shown in the displayed project panel.
- If multiple indexes are provided, each index must be separated by a singular space.
- The index(es) must be a positive integer 1, 2, 3, …
- The
d/prefix is required, but theDEADLINEis optional. - If a date is provided, it must be in the
dd-MM-yyyyformat. - Existing deadline will be updated to the new deadline for each project.
- To remove the deadline of a project, leave the
DEADLINEblank.
Examples:
-
dlP 2 d/18-01-2022sets the deadline of the 2nd project to be18-01-2022. -
dlP 1 2 d/removes the deadline of the 1st and 2nd projects. -
findP Infinityfollowed bydlP 1 d/25-11-2024sets the deadline of the 1st project in the results of thefindPcommand to be25-11-2024.
Prioritise projects: priorityP
Sets a priority for the specified project(s) in TaskHub.
Format: priorityP INDEX [MORE_INDEXES] p/PRIORITY
- Sets the priority of the project(s) at the specified
INDEX(ES). - The index(es) refers to the index number(s) shown in the displayed project panel.
- If multiple indexes are provided, each index must be separated by a singular space.
- The index(es) must be a positive integer 1, 2, 3,…
- The
PRIORITYmust be one of:low,normalorhigh.
Examples:
-
listPfollowed bypriorityP 1 2 p/highsets the 1st and 2nd projects as high priority in TaskHub.
List all projects: listP
Shows a list of all projects in TaskHub.

Format: listP
Locate projects by name: findP
Find projects whose names contain any of the given keywords. Additionally, it shows only the employees that are under these projects.
Format: findP KEYWORD [MORE_KEYWORDS]…
- The search is case-insensitive. e.g.
websitewill matchWebsite - The order of the keywords does not matter. e.g.
Create Websitewill matchWebsite Create - Only the name is searched.
- Only full words will be matched e.g.
Websitewill not matchWebsites - Projects matching at least one keyword will be returned (i.e.
ORsearch). e.g.Website Modelwill returnCreate Website,Build Model
Examples:
-
findP website modelreturnsCreate Website,Build Model -
findP marketreturnsMarket Expansion
Task Commands
Command Parameters
| Parameter | Description | Examples |
|---|---|---|
TASK_NAME |
The task’s name. It should only contain alphanumeric characters and spaces. It should not be blank and should not exceed 80 characters. |
- Create Wireframes- Responsive Web Design
|
PROJECT_INDEX |
The index number of the project as shown in the project panel. It should be a positive integer, and should not be more than the number of projects currently shown in the displayed project panel. It should be less than 1000. |
- 1
|
EMPLOYEE_INDEX |
The index number of the employee as shown in the specified project on the project panel. It should be a positive integer, and should not be more than the number of employees present in the specified project. It should be less than 1000. |
- 2
|
TASK_INDEX |
The index number of the task as shown in the specified project on the project panel. It should be a positive integer, and should not be more than the number of tasks currently in the specified project. It should be less than 1000. |
- 3
|
DEADLINE |
The task’s deadline. It must be a valid date and time in the dd-MM-yyyy HHmm format. |
- 11-11-2023 2359- 28-02-2024 0900
|
Note that some of the limits for the parameters stated above are not enforced by the application. You are recommended to follow these limits for the best user experience. We may enforce them in a future iteration.
Add a new task to a project: addT
Adds a new task to the specified project in TaskHub and assigns it to the (optionally) specified employee.
Format: addT n/TASK_NAME pr/PROJECT_INDEX [em/EMPLOYEE_INDEX] d/DEADLINE
- Adds a new task to the project at the specified
PROJECT_INDEX. - The employee index field is optional - the task will be assigned to the employee at
EMPLOYEE_INDEXif specified, - otherwise it will have no assignee, and
assignTcan be used after that to assign it to an employee. - The indexes must be positive integers 1, 2, 3,…
- The deadline must be in the format
dd-MM-yyyy HHmm. - It is possible for the deadline of the task to be after the deadline of the project.
Examples:
-
listPfollowed byaddT pr/1 n/Website d/11-10-2023 2359adds a task namedWebsitewith deadline11-10-2023 2359to the 1st project. -
findP Capstonefollowed byaddT pr/1 n/Website d/11-10-2023 2359adds a task namedWebsitewith deadline11-10-2023 2359to the 1st project from the result of thefindPcommand.
Delete a task from a project: deleteT
Delete the specified task(s) from the specified project in TaskHub.
Format: deleteT pr/PROJECT_INDEX t/TASK_INDEX [MORE_TASK_INDEXES]
- Delete the task(s) at the specified
TASK_INDEX(es), from the project at the specifiedPROJECT_INDEX. - The project index refers to the index number shown in the displayed project panel.
- The task index(es) refer to the index number(s) shown in the task list of the above specified project.
- The indexes must be positive integers 1, 2, 3,…
![]() Danger
Danger
- This action is irreversible.
- Please ensure that you are certain that you want to delete the task before proceeding.
Examples:
-
listPfollowed bydeleteT pr/1 t/1 3deletes the 1st and 3rd tasks of the 1st project from TaskHub. -
findP Capstonefollowed bydeleteT pr/2 t/2deletes the 2nd task in the 2nd project from the results of thefindPcommand.
Mark task(s) as completed: markT
Marks the specified task(s) of a specified project as completed in TaskHub.
Format: markT pr/PROJECT_INDEX t/TASK_INDEX [MORE_TASK_INDEXES]
- Marks the tasks(s) at the specified
TASK_INDEX(es), of the project at the specifiedPROJECT_INDEXas completed. - The project index refers to the index number shown in the displayed project panel.
- The task index(es) refer to the index number(s) shown in the task list of the above specified project.
- If multiple indexes are provided, each index must be separated by a singular space.
- The indexes must be positive integers 1, 2, 3,…
Examples:
-
listPfollowed bymarkT pr/1 t/1 3marks the 1st and 3rd tasks of the 1st project as completed in TaskHub. -
findP Capstonefollowed bymarkT pr/2 t/2marks the 2nd task in the 2nd project from the results of thefindPcommand as completed.
Mark task(s) as incomplete: unmarkT
Marks the specified task(s) of a specified project as incomplete in TaskHub.
Format: unmarkT pr/PROJECT_INDEX t/TASK_INDEX [MORE_TASK_INDEXES]
- Marks the tasks(s) at the specified
TASK_INDEX(es), of the project at the specifiedPROJECT_INDEXas incomplete. - The project index refers to the index number shown in the displayed project panel.
- The task index(es) refer to the index number(s) shown in the task list of the above specified project.
- If multiple indexes are provided, each index must be separated by a singular space.
- The indexes must be positive integers 1, 2, 3,…
Examples:
-
listPfollowed byunmarkT pr/1 t/1 3marks the 1st and 3rd tasks of the 1st project as incomplete in TaskHub. -
findP Capstonefollowed byunmarkT pr/2 t/2marks the 2nd task in the 2nd project from the results of thefindPcommand as incomplete.
Sort tasks by deadline and completion status: sortT
Sorts the tasks in each project in the displayed project panel by their deadline and completion status.
Format: sortT
- The sorting of tasks is done within each project i.e. tasks from different projects are not compared.
- Incomplete tasks will be placed before completed ones and tasks with an earlier deadline will be placed before those with a later one.
- Completion status takes precedence over deadline i.e. an incomplete task with a later deadline will be placed before a completed task with an earlier deadline.
Assignment Commands
Command Parameters
| Parameter | Description | Examples |
|---|---|---|
PROJECT_INDEX |
The index number of the project as shown in the project panel. It should be a positive integer, and should not be more than the number of projects currently shown in the displayed project panel. It should be less than 1000. |
- 1
|
EMPLOYEE_INDEX |
This has slightly different meanings depending on the command that uses this parameter.assignP/unassignP:The index number of the employee as shown in the employee panel. It should not be more than the number of employees currently shown in the displayed employee panel. assignT:The index number of the employee as shown in the specified project on the project panel. It should not be more than the number of employees present in the specified project. In all cases:It should be a positive integer and it should be less than 1000. |
- 2
|
TASK_INDEX |
The index number of the task as shown in the specified project on the project panel. It should be a positive integer, and should not be more than the number of tasks currently in the specified project. It should be less than 1000. |
- 3
|
Note that some of the limits for the parameters stated above are not enforced by the application. You are recommended to follow these limits for the best user experience. We may enforce them in a future iteration.
Assign employee(s) to a project: assignP
Assigns employee(s) to a project in TaskHub.
Format: assignP pr/PROJECT_INDEX em/EMPLOYEE_INDEX [MORE_EMPLOYEE_INDEXES] ...
- The employee(s) specified by the
EMPLOYEE_INDEX(ES)will be assigned to the project specified by thePROJECT_INDEX. - The project index refers to the index number shown in the displayed project panel.
- The employee index(es) refer to the index number(s) shown in the displayed employee panel.
- If multiple indexes are provided, each index must be separated by a singular space.
- The indexes must be positive integers 1, 2, 3,…
Examples:
-
listfollowed byassignP pr/2 em/1 3will assign the 1st and 3rd employees to the 2nd project. -
findP Capstonefollowed byassignP pr/1 em/1will assign the 1st employee to the 1st project from the results of thefindPcommand.
Un-assign employee(s) from a project: unassignP
Un-assigns employee(s) from a project in TaskHub.
Format: unassignP pr/PROJECT_INDEX em/EMPLOYEE_INDEX [MORE_EMPLOYEE_INDEXES] ...
- The employee(s) specified by the
EMPLOYEE_INDEX(ES)will be un-assigned from the project specified by thePROJECT_INDEX. - The project index refers to the index number shown in the displayed project panel.
- The employee index(es) refer to the index number(s) shown in the displayed employee panel.
- If multiple indexes are provided, each index must be separated by a singular space.
- The indexes must be positive integers 1, 2, 3,…
![]() Warning
Warning
- If an employee to be unassigned from the project is currently assigned to a task within the project, the employee will be unassigned from the task as well.
Examples:
-
listfollowed byunassignP pr/2 em/1 3will un-assign the 1st and 3rd employees from the 2nd project. -
findP Capstonefollowed byunassignP pr/1 em/1un-assigns the 1st employee from the 1st project from the results of thefindPcommand.
Assign an employee to a task: assignT
Assigns a specified employee in a specified project to a specified task in that project.
Format: assignT pr/PROJECT_INDEX t/TASK_INDEX em/EMPLOYEE_INDEX
- The employee specified by the
EMPLOYEE_INDEXwill be assigned to the task specified by theTASK_INDEXin the project specified by thePROJECT_INDEX. - The project index refers to the index number shown in the displayed project panel.
- The task index refers to the index number of the task as shown in the specified project on the project panel.
- The employee index refers to the index number of the employee as shown in the specified project on the project panel.
- The indexes must be positive integers 1, 2, 3,…
![]() Warning
Warning
- In this version of TaskHub, only a single employee can be assigned to a task at a time.
- Assigning a task that has already been assigned to another employee will overwrite that employee.
Examples:
-
listPfollowed byassignT pr/1 t/1 em/2assigns the first task in the first project to the second employee in the project. -
findP Capstonefollowed byassignT pr/2 t/2 em/2assigns the second task, in the second project from the results offindP, to the second employee in the project.
Un-assign an employee from a task: unassignT
Un-assigns the currently assigned employee from the specified task in the specified project.
Format: unassignT pr/PROJECT_INDEX t/TASK_INDEX
- The currently assigned employee, if exists, will be un-assigned from the task specified by the
TASK_INDEXin the project specified by thePROJECT_INDEX. - The project index refers to the index number shown in the displayed project panel.
- The task index refers to the index number of the task as shown in the specified project on the project panel.
- The indexes must be positive integers 1, 2, 3,…
Examples:
-
listPfollowed byunassignT pr/1 t/1un-assigns the first task in the first project from the currently assigned employee. -
findP Capstonefollowed byunassignT pr/2 t/2un-assigns the second task, in the second project from the results offindP, from the currently assigned employee.
Data Storage
Save the data
TaskHub’s data is saved in the hard disk automatically after any command that changes the data. There is no need to save manually.
Edit the data file
TaskHub data are saved automatically as a JSON file [JAR file location]/data/taskhub.json. Advanced users are welcome to update data directly by editing that data file.
FAQ
Q: Why is all my TaskHub data gone?
A: Most likely, your data is still mostly intact, so it is recommended to exit the app first by manually closing the window or the shortcut Alt + F4 as executing some commands such as addE,exit and clear will clear the previously stored data in this situation.
Taskhub may appear empty as it requires all data stored in the data file to be in the correct format so that it can be read back to TaskHub. A TaskHub that suddenly becomes empty indicates an issue with the data file.
.json format, and how TaskHub stores data. If you are unfamiliar, please check out this website to know more about .json files If you have directly changed any data in the
taskhub.json file instead of through TaskHub, it is highly likely that it would be in the wrong format, resulting in an empty TaskHub.To attempt to recover as much data as possible, it is recommended to save a copy of the
taskhub.json file somewhere else and perform the following actions:1. Remove all projects from your
taskhub.json file. ("projects" : [] should be the result after this operation, like the image shown below)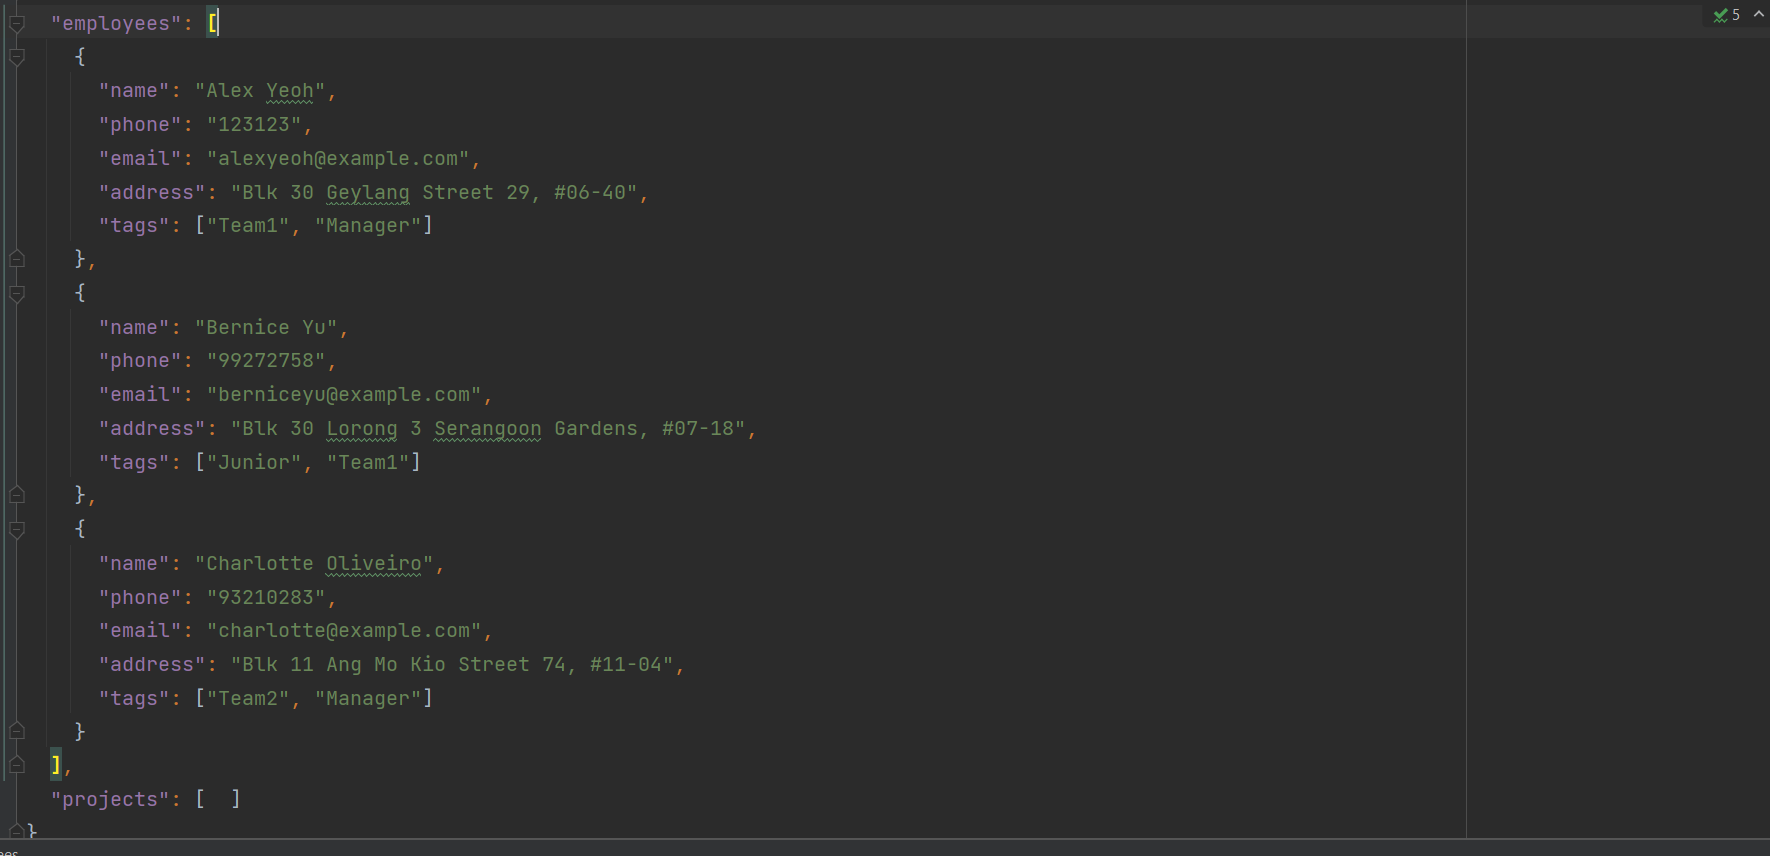 2. Run TaskHub with the edited
 taskhub.json file. If the list of employees is shown, then the problem lies in your projects. Otherwise, a format error lies in the "employee" section of your json file.
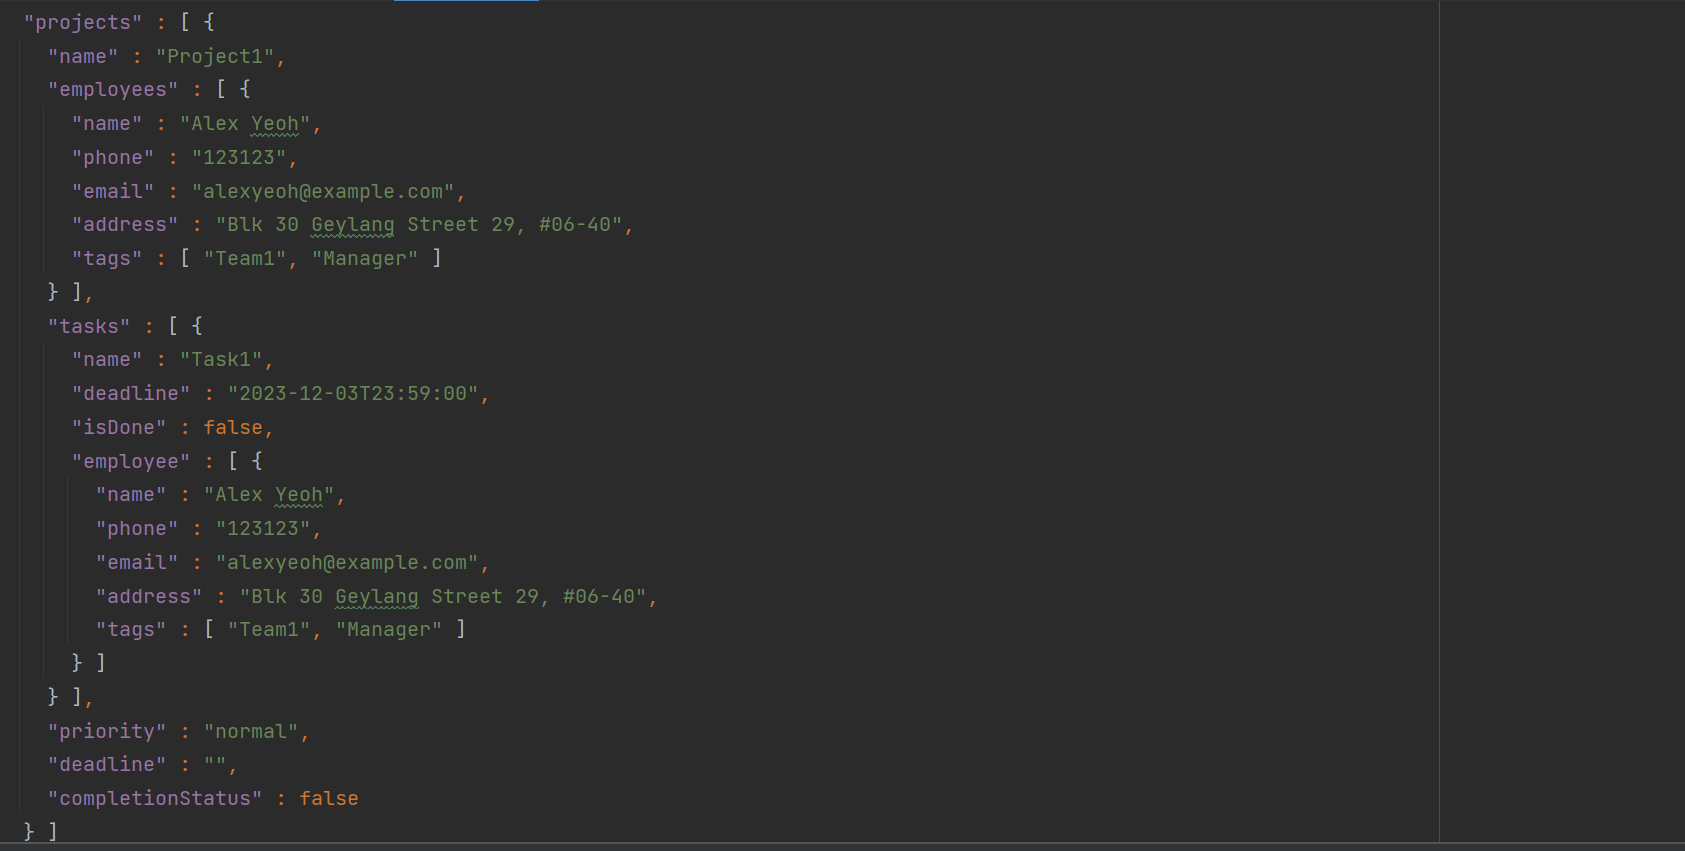
It is recommended to start from scratch because most likely your projects and tasks that involve the employee have different degree of changes, and it might be impractical to manually change each occurence of the employee.3. Now, add each project one by one, ensuring that TaskHub can run normally after each project addition. If TaskHub appears empty after the addition of a particular project, it is most likely that the employees in the project are different from those stored in TaskHub. Check the employees assigned in your project and employees assigned to relevant tasks, making sure every field is equal to its counterpart in the employee list.
While checking an employee assigned to a task, make sure the employee is the same employee in the project and in the employee list. Each project should have this format:
 4. Repeat the step above until every project is added to TaskHub.
If you have not changed anything, ensure your
data folder containing your taskhub.json is in the same folder as your taskhub.jar.Q: Why is TaskHub not loading for me?
A: If you did modify your taskhub.json file, it is most likely that you put the keyword null somewhere in the json file. Removing these keywords should at least present to you an empty TaskHub.
Another possibility is that your taskhub.log or taskhub.json files are set to read-only.
The first step is to open the folder that contains all your files related to TaskHub.
- For Windows users, right-click each file in your file explorer, click on properties and untick
Read-onlyinAttributes.
- For MacOS users, for each file in Finder choose
File>Get Info>Sharing & Permissions. Set the privilege for yourself to beRead & Write.
- For Linux users, run
chmod a+rw *in your terminal. If you have difficulty navigating to your directory that contains the files, check out the “Navigation and Exploration” section of this website.
Q: How do I transfer my data to another Computer?
A: Install the app in the other computer and overwrite the empty data file it creates with the file that contains the data of your previous TaskHub home folder.
Known issues
-
When using multiple screens, if you move the application to a secondary screen, and later switch to using only the primary screen, the GUI will open off-screen. The remedy is to delete the
preferences.jsonfile created by the application before running the application again.
Command summary
General Commands
| Action | Format, Examples |
|---|---|
| Help | help |
| List All Employees And Projects | list |
| Clear | clear |
| Exit | exit |
Employee Commands
| Action | Format, Examples |
|---|---|
| Add Employee |
addE n/NAME p/PHONE_NUMBER e/EMAIL a/ADDRESS [t/TAG]… e.g., addE n/James Ho p/22224444 e/jamesho@example.com a/123, Clementi Rd, 1234665 t/Java
|
| Edit Employee |
editE INDEX [n/NAME] [p/PHONE_NUMBER] [e/EMAIL] [a/ADDRESS] [t/TAG]… e.g., editE 1 n/John Doe p/11114444 e/johndoe@example.com a/123, Clementi Rd, 1234665 t/Python
|
| Delete Employee |
deleteE INDEXe.g., deleteE 3
|
| List All Employees | listE |
| Find Employee(s) |
findE KEYWORD [MORE_KEYWORDS]e.g., findE James Jake
|
Project Commands
| Action | Format, Examples |
|---|---|
| Add Project |
addP n/PROJECT_NAME [em/EMPLOYEE_INDEX]… e.g, addP n/CS2103T em/2 3 4 5
|
| Edit Project |
editP INDEX [n/NAME] [p/PRIORITY] [d/DEADLINE] e.g., editP 3 n/Create Website p/high
|
| Delete Project |
deleteP INDEXe.g., deleteP 3
|
| Mark Project(s) As Complete |
markP INDEX [MORE_INDEXES]e.g., markP 1 3
|
| Mark Project(s) As Incomplete |
unmarkP INDEX [MORE_INDEXES]e.g., unmarkP 1 3
|
| Edit Project Deadline |
dlP INDEX [MORE_INDEXES] d/[DEADLINE] e.g., dlP 1 2 d/27-11-2023 |
| Prioritise Project(s) |
priorityP INDEX [MORE_INDEXES] p/PRIORITY e.g., priorityP 1 2 p/high |
| List All Projects | listP |
| Find Project(s) |
findP KEYWORD [MORE_KEYWORDS]e.g., findP Website Create
|
Task Commands
| Action | Format, Examples |
|---|---|
| Add Task |
addT pr/PROJECT_INDEX [em/EMPLOYEE_INDEX] n/TASK_NAME d/DEADLINE(dd-MM-yyyy HHmm)e.g., addT pr/1 em/1 n/Read docs d/11-11-2023 2359
|
| Delete Task |
deleteT pr/PROJECT_INDEX t/TASK_INDEX [MORE_TASK_INDEXES] e.g., deleteT pr/1 t/1 5 3
|
| Mark Task(s) As Complete |
markT pr/PROJECT_INDEX t/TASK_INDEX [MORE_TASK_INDEXES]e.g., markT pr/1 t/1 3
|
| Mark Task(s) As Incomplete |
unmarkT pr/PROJECT_INDEX t/TASK_INDEX [MORE_TASK_INDEXES]e.g., unmarkT pr/1 t/1 3
|
| Sort Tasks By Deadline And Completion Status | sortT |
Assignment Commands
| Action | Format, Examples |
|---|---|
| Assign Employee(s) To Project |
assignP pr/PROJECT_INDEX em/EMPLOYEE_INDEX [MORE_EMPLOYEE_INDEXES]… e.g, assignP pr/4 em/1 2 3
|
| Un-assign Employee(s) From Project |
unassignP pr/PROJECT_INDEX em/EMPLOYEE_INDEX [MORE_EMPLOYEE_INDEXES] e.g, unassignP pr/2 em/1 3
|
| Assign Employee to Task |
assignT pr/PROJECT_INDEX t/TASK_INDEX em/EMPLOYEE_INDEX e.g., assignT pr/1 t/1 em/3
|
| Un-assign Employee from Task |
unassignT pr/PROJECT_INDEX t/TASK_INDEX e.g., unassignT pr/1 t/1
|
Appendix A: Installing Java
Follow these steps to install Java on your computer:
-
Download Java 11:
- Download Java 11 from Oracle’s website based on your operating system.
- Follow the instructions on Oracle’s website
- Verify Installation: After installation, open a terminal (on MacOS) or Command Prompt (on Windows) and run the following commands to verify that Java is installed:
java -version
If installed correctly, you should see version information for both Java and the Java Compiler. The message should look something like this:
openjdk version "11.0.20" 2023-07-18 LTS
OpenJDK Runtime Environment Zulu11.66+15-CA (build 11.0.20+8-LTS)
OpenJDK 64-Bit Server VM Zulu11.66+15-CA (build 11.0.20+8-LTS, mixed mode)
Now, you’re ready to proceed with the launching of TaskHub. Click here to get back to the installation tutorial.